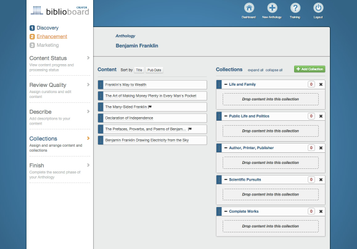
Collections Panel
- Jesse Darland
- Emily Gooding
- JasonY
The Collections panel allows you to distribute your content into separate sub-collections, much like chapters in a book. Creator requires at least one collection, but you can create as many as you need. Collections can divide up anthology by theme, genre, time period, etc. Each object must be placed in a collection. A single piece of content can only be put in one collection.
Adding Collections
Click the  button to create a new collection. You will be prompted to add a collection name and a short description. Each collection also has a collection icon. You can upload a file from your computer or choose from among the Visual Browse Stream (VBS) images you selected in the Review Quality panel.
Collection icons must be at least 400×276 pixels because if the image is any smaller than 400×276 pixels, it will appear pixelated and blurry in the final product.
Once an image has been chosen via upload or the VBS, you will be brought to an internal crop feature that will allow you to choose only a certain portion of the image and to ensure that your chosen image is the correct size. To crop the image, select the blue "Crop" button. Then, you will have the option to select the blue "Save" button or to select the gray "Undo" button which will take you back to the crop tool so that you can try again. You can also select the "Cancel" button, which will cancel the image, if that image was uploaded, and return you back to the VBS to pick another image, if that image was accessed via the VBS.
Finally, click the blue "Save" button and the collection will be generated in the right-hand column.
Placing Items into a Collection
Once items have been marked as Completed in the Describe Panel, you'll see them displayed in the left-hand column under the Content heading. Click and drag on the rectangular tile to drag an item into a collection. You may also right-click on an item and select the name of a collection from the menu that appears. To move multiple items, you can hold down the shift key on your keyboard and select multiple items. Then, you can either drag and drop the selected items at once or you may right click and select the name of the desired collection for all of the selected content.
Arranging Items in a Collection
When a collection contains two or more objects, you will see two buttons:  Clicking "Title" will sort the collection’s contents alphabetically by title, and clicking "Pub Date" will sort the collection's content by publication date. You can also manually reorder the contents of a collection by dragging and dropping.
Arranging Collections
Much like how content within a collection can be organized into a customized order by dragging and dropping, the collections themselves can be put into a customized order by dragging and dropping.
Finish
Once you are satisfied with the way your collections are sorted, you are ready to click "Finish" in the left-hand column of Creator and move onto the Marketing Phase.